Vue.js, a popular front-end JavaScript framework, empowers developers to build dynamic and interactive web applications with ease. Central to Vue.js is its component-based architecture, where components have their own lifecycle. Understanding the Vue.js component lifecycle is essential for writing efficient, maintainable, and bug-free code. In this blog, we will dive deeper into the five main phases of the Vue.js component lifecycle, exploring each lifecycle hook in detail and providing real-world examples to solidify your understanding. Vue.js Component Lifecycle: A Comprehensive Guide
- Creation Phase: The creation phase is where components are initialized and their data structures are set up. We’ll explore the
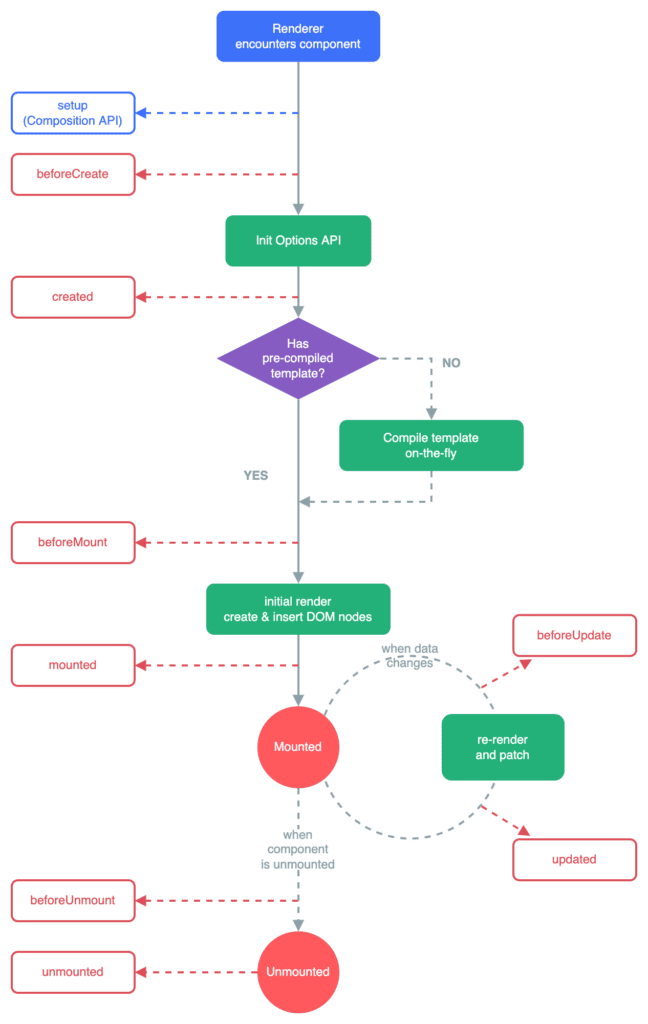
beforeCreatehook, which is perfect for tasks like setting up global event listeners or initializing external plugins before the component is created. Thecreatedhook, on the other hand, is well-suited for asynchronous operations, such as making API calls to fetch initial data for the component. - Mounting Phase: As components are about to be rendered into the DOM, the mounting phase comes into play. We’ll take a closer look at the
beforeMounthook, which allows us to perform actions just before the component is added to the DOM. This hook is useful for fine-tuning the component or performing some final data manipulation. Themountedhook, executed after the component is mounted, enables us to interact with the DOM, initiate animations, or integrate third-party libraries. - Updating Phase: In the updating phase, components undergo changes to their data, triggering re-rendering. We’ll explore the
beforeUpdatehook, ideal for capturing the state of the DOM or performing optimizations before the component updates. Theupdatedhook is a powerful tool for executing tasks after the component’s data has been re-rendered, such as updating external libraries or handling interactions with the updated DOM. - Destruction Phase: Components have a lifecycle end, and it’s essential to handle their cleanup properly. We’ll examine the
beforeDestroyhook, which allows us to free up resources, remove event listeners, or perform other necessary cleanup tasks before a component is destroyed. Thedestroyedhook is the last chance to access the component before it’s gone, making it suitable for logging or releasing additional resources. - Error Handling and Other Hooks: Errors are an inevitable part of development. We’ll explore the
errorCapturedhook, which provides a way to handle errors occurring within a component or its children. Additionally, we’ll discuss other hooks, likedeactivatedandactivated, that come into play when components are deactivated and reactivated, allowing us to optimize resources and provide smoother transitions.
Example:
Let’s go through an example of a Vue.js component and demonstrate how each lifecycle hook works with a practical use case.
Suppose we have a simple Vue component called “CounterComponent” that displays a counter and allows the user to increment it. We’ll use this component to showcase the different lifecycle hooks.
<!-- CounterComponent.vue -->
<template>
  <div>
    <h2>Counter: {{ counter }}</h2>
    <button @click="increment">Increment</button>
  </div>
</template>

<script>
export default {
  data() {
    return {
      counter: 0,
    };
  },
  methods: {
    increment() {
      this.counter++;
    },
  },
  beforeCreate() {
    console.log("beforeCreate: Component is about to be initialized.");
  },
  created() {
    console.log("created: Component is initialized.");
    // Perform asynchronous operation, like fetching data from an API
    // Simulate an API call with setTimeout
    setTimeout(() => {
      this.counter = 10; // Set an initial value after data is fetched
    }, 1000);
  },
  beforeMount() {
    console.log("beforeMount: Component is about to be added to the DOM.");
  },
  mounted() {
    console.log("mounted: Component is added to the DOM.");
    // Access the DOM or interact with third-party libraries
  },
  beforeUpdate() {
    console.log("beforeUpdate: Component is about to be updated.");
  },
  updated() {
    console.log("updated: Component is updated.");
  },
  beforeDestroy() {
    console.log("beforeDestroy: Component is about to be destroyed.");
  },
  destroyed() {
    console.log("destroyed: Component is destroyed.");
  },
};
</script>
In the example above, we have implemented the “CounterComponent” with a data property counter and a method increment to increase the counter value. The component also includes each of the lifecycle hooks and logs messages to the console when each hook is called.
Here’s what happens when the component is used in a parent component:
<!-- ParentComponent.vue -->
<template>
  <div>
    <h1>Parent Component</h1>
    <CounterComponent />
  </div>
</template>

<script>
import CounterComponent from "./CounterComponent.vue";

export default {
  components: {
    CounterComponent,
  },
};
</script>
Let’s go through the lifecycle in sequence:
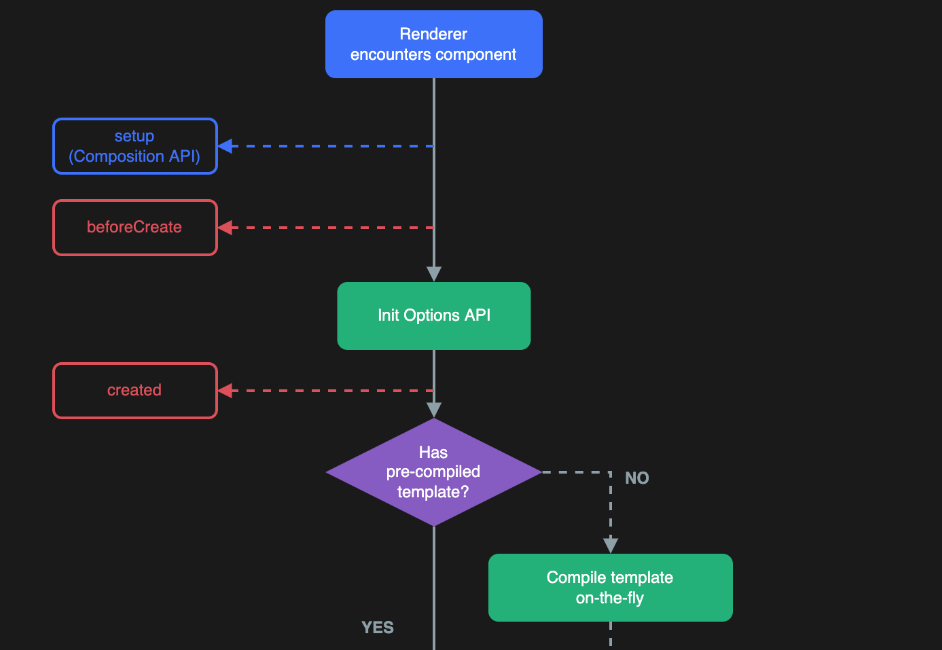
- beforeCreate: This hook is called before the component is initialized. In the console, you’ll see the message “beforeCreate: Component is about to be initialized.”
- created: This hook is called after the component is initialized. In the console, you’ll see the message “created: Component is initialized.” In this example, we simulate an asynchronous operation (e.g., API call) with a
setTimeoutfunction and set an initial value for thecounterafter the data is fetched. - beforeMount: This hook is called just before the component is added to the DOM. In the console, you’ll see the message “beforeMount: Component is about to be added to the DOM.”
- mounted: This hook is called after the component is added to the DOM. In the console, you’ll see the message “mounted: Component is added to the DOM.”
- beforeUpdate: This hook is called when the component data changes, but before the DOM is re-rendered. If you click the “Increment” button in the UI, this hook will be triggered, and the message “beforeUpdate: Component is about to be updated.” will be logged.
- updated: This hook is called after the component data changes, and the DOM is re-rendered. After clicking the “Increment” button, the message “updated: Component is updated.” will be logged.
- beforeDestroy: This hook is called before the component is destroyed. If you remove the component from the parent component’s template, you’ll see the message “beforeDestroy: Component is about to be destroyed.” in the console.
- destroyed: This hook is called after the component is destroyed. The message “destroyed: Component is destroyed.” will be logged after the component is removed from the DOM.
By observing the console logs, you can see how each lifecycle hook is called at different stages of the component’s life. This provides valuable insights into when and how to perform certain actions, such as fetching data, interacting with the DOM, or cleaning up resources when a component is destroyed. Understanding these lifecycle hooks will help you write more efficient and maintainable Vue.js applications.
Conclusion:
The Vue.js component lifecycle is a powerful toolset that empowers developers to build applications with rich functionality and smooth user experiences. By understanding each lifecycle hook’s purpose and when to use them, you can optimize your code, handle errors gracefully, and create more maintainable and efficient applications. Armed with this knowledge, you’ll be better equipped to tackle real-world Vue.js projects and delight your users with exceptional web applications. Happy coding!
Vuejs official Documentation: https://vuejs.org/guide/essentials/lifecycle.html
More posts on Vuejs: https://coderboi.com/category/vue/